In addition to the default GTA game controls, here are a few more keys which you will find become common use.
GENERAL PLAYER CONTROLS
| Key
|
Action
|
| N
|
Push To Talk (need to enable in Voice Settings - see FAQ)
|
| CAPS
|
Main Player Menu (Clothing, Animations, Vehicle Actions, Job Actions)
|
| ALT
|
Archies Eye
|
| F1
|
Interface Options
|
| F2
|
Opens Mobile Phone (purchase from store)
|
| F3
|
Player Inventory
|
| F5
|
Information Menu (Rules, Controls, Wiki)
|
| F6
|
Gang Menu
|
| T
|
Out Of Character Chat
|
| X
|
Hands Up!
|
| BACKSPACE
|
Back In Menu
|
| G
|
Change Voice Level
|
| B
|
Points Your Finger
|
| L
|
Locks/Unlocks Your Vehicle
|
| Y
|
Opens Vehicle Inventory
|
| Key
|
Normal Action
|
In Vehicle Action
|
| U
|
Ragdoll
|
Cruise Control
|
| K
|
|
Seatbelt Toggle
|
|
GROUP / JOB CONTROLS
| Key
|
Action
|
| CAPS
|
Job Actions
|
| SHIFT+B
|
Panic Button
|
| ALT+R
|
Restrain
|
| SHIFT+G
|
Grab
|
| SHIFT+H
|
Take Out Radio
|
| M
|
Broadcast On Radio
|
| PGUP
|
Up 1 Radio Frequency
|
| PGDN
|
Down 1 Radio Frequency
|
| G
|
Command Dog
|
| Police and NHS Vehicle Controls
|
| Q
|
Emergency Lights On/Off
|
| CTRL+Q
|
Secondary Lights On/Off
|
| ALT
|
Sirens On/Off
|
| NUM 0
|
Siren Tone Change
|
| NUM5
|
Activate ANPR
|
| NUM4
|
Run Rear Vehicle Plate On PNC
|
| NUM6
|
Run Front Vehicle Plate On PNC
|
| NUM7
|
Trigger Failure To Stop (Front Vehicle)
|
| NUM8
|
Freeze ANPR
|
| NUM9
|
Add To ANPR Watch List
|
| I
|
Set GPS Location To Last Dispatch
|
| O
|
Dispatch List (Left-Click To Set GPS To Alert | Right-Click to Pin/Unpin Alert)
|
|
Interactions
LEFT ALT Eye Interactions
The Eye Interactions is used for most interactions with the world around. This can be done by looking at the object you are trying to interact with and pressing LEFT ALT then using your mouse to select. Watch this video for a more in depth preview of the system.
CAPS Interaction Wheel
For self-interactions the Interaction Wheel is generally used. Press CAPS then use your mouse to select an interaction. This is used for a lot of clothing related situations.
Item Minigames
Some items when used require you to interact with a mini-game to complete the task. Failing to complete can have different outcomes depending on what you're trying to do (you may lose the item, for example). Some tasks may also be different depending on skills your character has.
To complete the task, you need to press the key that represents the number written in the middle of the circle, when the red ball is within the blue area. The blue area will change position and size and the speed of which the ball moves around the circle will also vary, so be prepared!
With the example below, as soon as the red ball enters the blue zone you would press 3.
Server Commands
| Either type with the slash in chat message (open with T) or without slash in F8 console menu
Where a parameter is listed such as <Session ID> - the value should NOT include the < > brackets
Example: /e <Emote> would be typed like /e sit
| C
|
| /callsign_set <callsign>
|
Sets callsign of unit
|
| /callsign_setstate <state number>
|
Sets callsign status
|
| /callsign_set_vehicle <roof number>
|
Sets vehicle roof number
|
| /carry
|
Offers to carry the player you are standing next to
|
| /crouch
|
Toggles crouch animation - Default Key CTRL
|
| /cycleproximity
|
Toggles VOIP Proximity - Default Key G
|
| /cruisecontrol
|
Toggles Cruise Control - Default Key U
|
| D
|
| /dispatch
|
Toggles dispatch alerts on/off related to your job
|
| /do <Message>
|
Message that appears on your player - use to communicate an action to others around you
|
| E
|
| /e <Emote> or /emote <Emote>
|
Character does the given emote (options can be found doing /emotes)
|
| /e c
|
Cancels emote/animation - Default Key Z
|
| /emotes
|
Provides a list of emotes that can be done with /e [Emote]
|
| /emotemenu
|
Opens menu to select animation/emote/walks
|
| /escort confirm
|
Escort players - Default Key SHIFT + G
|
| F
|
| /flip
|
Flips a coin - returns heads or tails and shows those around you the result
|
| /frequency number <Freq number>
|
Changes radio frequency to the provided value
|
| G
|
| /gangmenu
|
Opens the Gang Menu - Default Key F6
|
| /givekey Session ID
|
When in a car that you have keys for, will give a copy of the key to the player with that session ID
|
| M
|
| /me <Message>
|
Message that appears on your player - use to communicate an action to others around you
|
| /medical <Message>
|
Message that appears on your player - use to communicate medical action to others around you
|
| N
|
| /nearby <Emote>
|
Shared emotes to do with people near you - see /emotemenu > "Shared Emotes" for full list
|
| O
|
| /openphone
|
Opens phone UI - Default Key F2
|
| /openinventory
|
Opens inventory UI - Default Key F3
|
| /opentrunkinventory
|
Opens vehicle trunk UI - Default Key Y
|
| /openguide
|
Opens Help / Wiki Page - Default Key F5
|
| /ooc Message
|
Type a message in OOC chat - the whole server will see this.
|
| /looc Message
|
Type a message in LOOC chat - local ooc chat - people near you will see this.
|
| P
|
| /playermenu
|
Opens player options UI - Default Key F1
|
| /pnc
|
Police Only - Opens PNC Window
|
| R
|
| /radio
|
Opens/Closes Radio Options - Default Key SHIFT + H
|
| /radio_freqdown
|
Decreases radio frequency by 1 (keybind available to be bind in FiveM Controls)
|
| /radio_frequp
|
Increases radio frequency by 1 (keybind available to be bind in FiveM Controls)
|
| /radio_panic Confirm
|
Panic Button Press - Code Zero - Default Key SHIFT + B
|
| /radio_voldown
|
Decreases Radio Volume (keybind available to be bind in FiveM Controls)
|
| /radio_volup
|
Increases Radio Volume (keybind available to be bind in FiveM Controls)
|
| /recordstart
|
Starts R* Clip Recording
|
| /recordsave
|
Stops and Saves R* Clip Recording
|
| /recorddiscard
|
Stops and discards R* Clip Recording
|
| /restrain confirm
|
Allows you to restrain someone - Default Key (Factions) ALT + R
|
| /roll number
|
Results with a random number between 1 and the number you input, shows to those around you
|
| S
|
| /seat <-1 to x>
|
Swap seat. (Driver is -1 passenger is 0)
|
| /sessionheads
|
Reveals ID of player above their heads for short period time. Cooldown applies after
|
| /siren_lights primary
|
Blue/Amber lights on vehicles - Default Key Q
|
| /siren_lights secondary
|
Rear red lights on vehicles - Default Key SHIFT + Q
|
| /stream
|
Enables Streamer Mode - Disable in F1 menu
|
| T
|
| /think <Message>
|
Message that appears on your player - use to communicate an thought to others around you
|
| /togglelock
|
Locks/Unlocks Car if you have the key - Default Key L
|
| W
|
| /walk Style
|
Changes the style of walk for your character - options are available when doing /walks
|
| /walks
|
Lists the available walk styles which can be selected using /walk [Style]
|
| /window up/down
|
Lowers car window up/down
|
|
Inventory
Various shortcuts are included with the inventory to make certain tasks easier and quicker.
Shift + Left Click - Moves selected items to second inventory if one is open (car boot, evidence locker, etc)
Double Click - Uses item selected (eats food, applies armour, etc)
Setting the number to 0 will allow you to move all of the specified item at once, no matter how many there are.
Directional Radio
You can now have directional radio audio on server thanks to the most recent VoIP update.
|
|
| /abalance radio left 100 | /abalance radio right 1
|
To have radio audio come out of your left ear only
|
| /abalance radio left 1 | /abalance radio right 100
|
To have radio audio come out of your right ear only
|
| /abalance radio left 100 | /abalance radio right 100
|
To have the radio audio return to default
|
|
|
Creating a Custom Shortcut for RPUK
If RPUK is the main server you play on, you can create a custom shortcut so that when you launch FiveM it has everything ready for you. If RPUK is not your main server but you still want a custom shortcut, you can create multiple shortcuts by creating copies of the launch application.
Step 1: Find and create your Shortcut.
If you launch from your desktop via this icon:

This is your shortcut, and you can create multiple shortcuts by copying this. However, if you launch from your start menu, your shortcut is located below:
C:\Users\%username%\AppData\Roaming\Microsoft\Windows\Start Menu\Programs
Step 2: Edit your shortcut.
Right click on your shortcut and click properties which will bring up a menu like this:
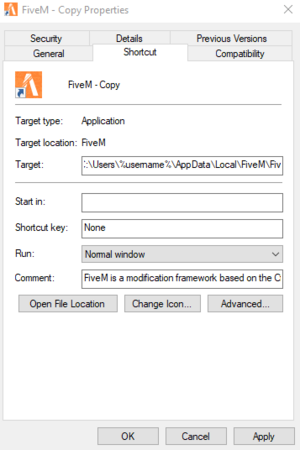
You will edit the Target portion. You will type -pure_1 at the end of the target box. Your Target box should now look like this:
C:\Users\%username%\AppData\Local\FiveM\FiveM.exe -pure_1
It is important to note that if all the text in the target box is wrapped in quotes, you need to add the text inside the quotes.
This will put the launcher into the ready state to connect to RPUK, but there are other things you can put into the Target box to further automate the process for you.
Optional: Build Number
Other servers may be on a different server build than RPUK which will result in FiveM having to restart to change builds before you are able to connect to RPUK. To have the shortcut place you into the correct build every time, you will add +b3258 in your target box which will appear as below:
C:\Users\%username%\AppData\Local\FiveM\FiveM.exe -pure_1 +b3258
(+b3258 is the current build of RPUK as of 05/03/2025)
Optional: Direct Connection to RPUK
You can have it direct connect to RPUK instead of having to manually connect via the launcher. You do this by adding +connect xaamj5 to your target box, and if you also added the build number it will appear as below:
C:\Users\%username%\AppData\Local\FiveM\FiveM.exe -pure_1 +b3258 +connect xaamj5
Final Step: Save the shortcut!
You don't want all your hard work going to waste. Click apply on your changes and have fun!


